Automatic Irrigation Kit with Soil Moisture Sensor and Water Pump
Introduction:
This guide provides detailed instructions for assembling and using the Automatic Irrigation Kit, which includes a soil moisture sensor and water pump. This DIY kit enables automated plant watering based on soil moisture levels, ensuring optimal hydration for your plants.
The below information is directly related to the product: Automatic Irrigation Kit with Soil Moisture Sensor and Water Pump – DIY
Components Included:
- Soil Moisture Sensor Probe
- Soil Moisture Sensor Module
- 5V Relay Module
- Mini Submersible Water Pump
- Plastic Battery Storage Case Holder
- USB Power Cable
- Jumper Wires
- 0.5m Vinyl Tubing
Specifications:
- Operating Voltage: 3.3V to 5V DC
- Relay Module: 5V, capable of switching up to 10A
- Water Pump: DC 3-6V, flow rate of 80-120 L/H
- Soil Moisture Sensor: Analog output, corrosion-resistant material
Assembly Instructions:
-
Connecting the Soil Moisture Sensor:
- Attach the two probes of the Soil Moisture Sensor Probe to the designated terminals on the Soil Moisture Sensor Module.
- Connect the sensor module’s VCC pin to the microcontroller’s or power source’s 3.3V or 5V power supply.
- Connect the sensor module’s GND pin to the ground (GND) of your microcontroller or power source.
- Connect the sensor module’s Analog Output (AO) pin to an analog input pin on your microcontroller (e.g., A0 on Arduino).
-
Setting Up the Relay Module:
- Connect the VCC pin of the Relay Module to the 5V power supply.
- Connect the GND pin of the Relay Module to the ground (GND).
- Connect the IN pin of the Relay Module to a digital output pin on your microcontroller (e.g., D2 on Arduino).
-
Connecting the Water Pump:
- Connect the water pump’s positive terminal to the relay module’s Normally Open (NO) terminal.
- Connect the negative terminal of the Water Pump to the ground (GND).
- Connect the relay module’s Common (COM) terminal to the positive terminal of your power source (e.g., battery or USB power supply).
-
Powering the System:
- Insert batteries into the Battery Holder and connect it to the power input of your microcontroller and Relay Module.
- Alternatively, use the USB Power Cable to supply power from a USB power source.
Operation Instructions:
- Ensure all connections are secure and the power supply is connected.
- Insert the Soil Moisture Sensor Probe into the soil near the plant roots.
- Upload the appropriate code to your microcontroller to monitor soil moisture levels and control the Relay Module accordingly.
- When the soil moisture level falls below the predefined threshold, the microcontroller will activate the Relay Module, turning on the Water Pump to irrigate the plants.
- Once the soil moisture level reaches the desired threshold, the microcontroller will deactivate the Relay Module and turn off the Water Pump.
Sample Arduino Code:
        const int sensorPin = A0; // Soil moisture sensor analog pin
        const int relayPin = 2;   // Relay module control pin
        const int threshold = 500; // Soil moisture threshold value

        void setup() {
            pinMode(relayPin, OUTPUT);
            digitalWrite(relayPin, LOW);
            Serial.begin(9600);
        }

        void loop() {
            int sensorValue = analogRead(sensorPin);
            Serial.print("Soil Moisture Level: ");
            Serial.println(sensorValue);

            if (sensorValue < threshold) {
                digitalWrite(relayPin, HIGH); // Turn on pump
                Serial.println("Pump ON");
            } else {
                digitalWrite(relayPin, LOW); // Turn off pump
                Serial.println("Pump OFF");
            }
            delay(1000);
        }
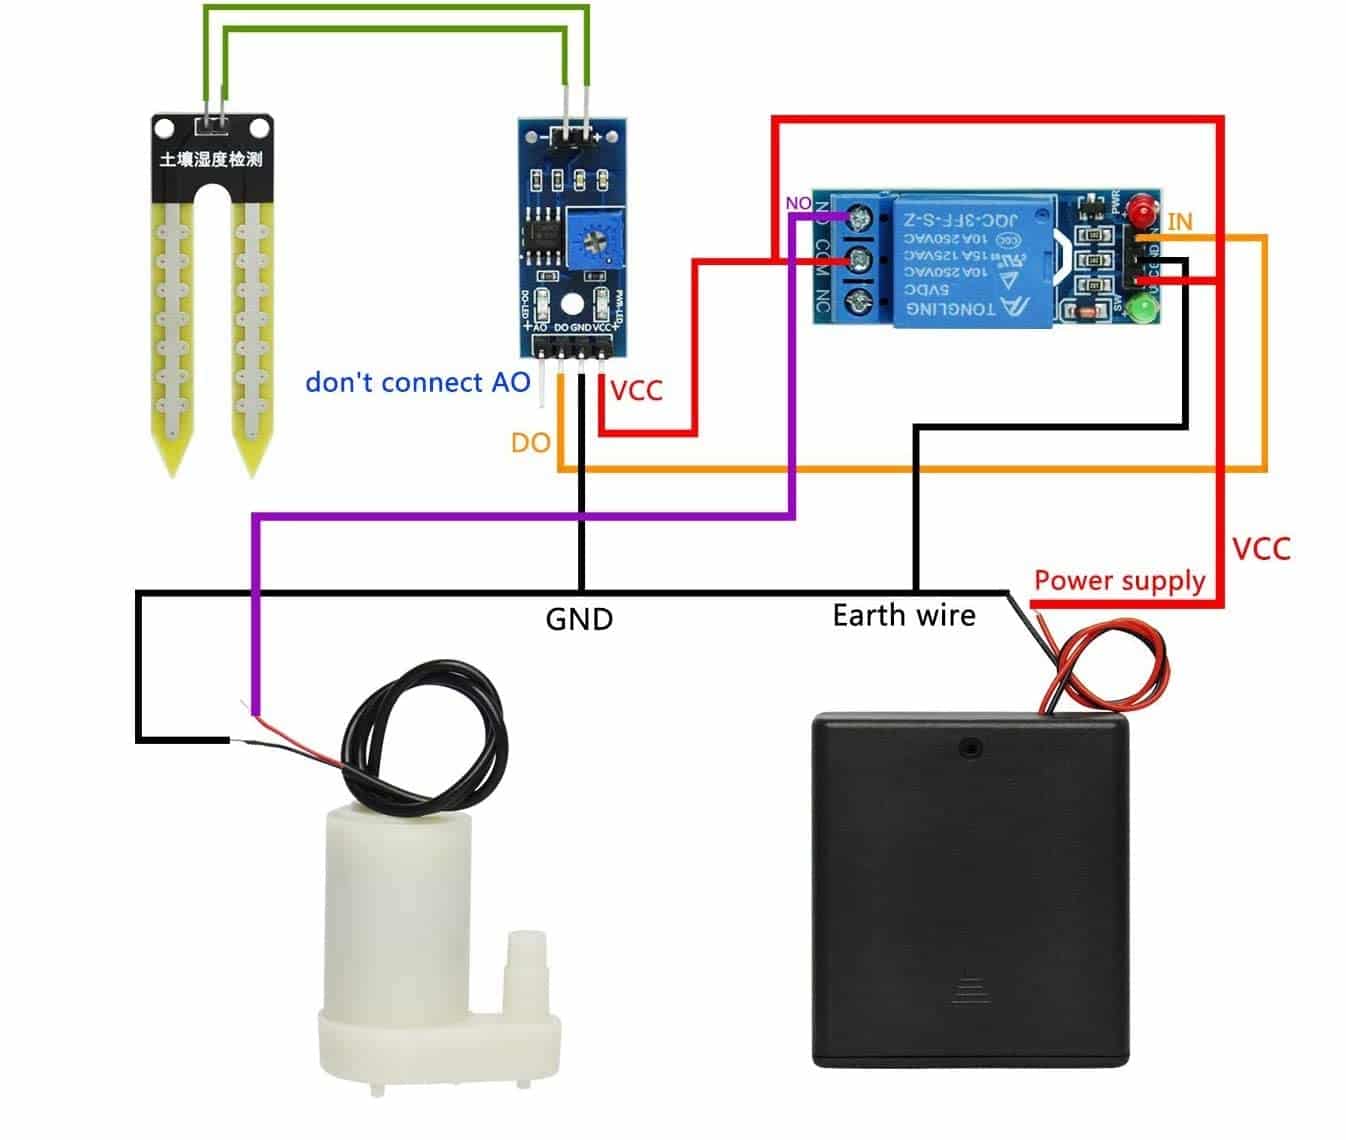
Standalone Setup:
Follow the wiring diagram below to set up this kit as a standalone setup that does not require a microcontroller.

Important Considerations:
- Calibration: Adjust the soil moisture threshold value in the code based on your specific soil and plant requirements.
- Power Supply: Ensure the power supply voltage matches the operating voltage of the components to prevent damage.
- Water Source: Use clean water to prevent Water Pump and tubing clogging.
- Maintenance: Regularly check the Soil Moisture Sensor and Water Pump for proper operation and clean them as needed.
Following these instructions will help you successfully assemble and operate the Automatic Irrigation Kit, which will maintain optimal soil moisture levels for your plants.
