Introduction
This tutorial details the BMP280 Module, its functions and will build a project using the BMP280 Module and an Arduino.
The BMP280 Module
The BMP280 module is a barometric pressure with a temperature sensor designed for mobile applications. The sensor has an impressive accuracy of ±1 hPa in measuring barometric pressure, ±1.0°C in temperature measurement and ±1 meter in altitude accuracy. In addition, the BMP280 supports both IIC and SPI communication protocols.
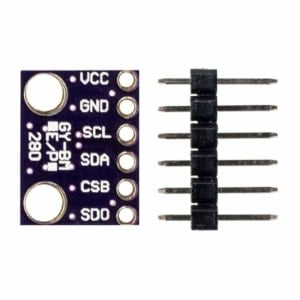
Pin Out
| Pin | Description |
|---|---|
| VCC | Power supply of the module (3.3/5 VDC) |
| GND | Ground |
| SCL | IIC Serial Clock |
| SDA | IIC Serial Data |
| CSB | SPI Chip Select |
| SDO | SPI Serial Data Out |
How It Works
The BMP280 module uses either IIC or SPI communication protocol to communicate with the microcontroller depending on user selection.
Project - Arduino Temperature, Pressure & Altitude Monitor
This project will demonstrate the barometric pressure, temperature and approximate altitude in the serial monitor.
Components
- Arduino Uno Board (1 pc.)
- BMP280 Module (1 pc.)
- Jumper Wires
Wiring Diagram
The BMP280 module pins are connected to the Arduino Uno board as follows:
| Module Pin | UNO Board Pin |
|---|---|
| VCC | 5V |
| GND | GND |
| SCL | A5 |
| SDA | A4 |

Code
Both of the following libraries for this module must first be downloaded. These libraries are available here;
Once the libraries are installed, the program code can be uploaded.
					/***************************************************************************
  This is a library for the BMP280 humidity, temperature & pressure sensor
  Designed specifically to work with the Adafruit BMP280 Breakout
  ----> http://www.adafruit.com/products/2651
  These sensors use I2C or SPI to communicate, 2 or 4 pins are required
  to interface.
  Adafruit invests time and resources providing this open source code,
  please support Adafruit andopen-source hardware by purchasing products
  from Adafruit!
  Written by Limor Fried & Kevin Townsend for Adafruit Industries.
  BSD license, all text above must be included in any redistribution
 ***************************************************************************/
#include <Wire.h>
#include <SPI.h>
#include <Adafruit_BMP280.h>
#define BMP_SCK  (13)
#define BMP_MISO (12)
#define BMP_MOSI (11)
#define BMP_CS   (10)
Adafruit_BMP280 bmp; // I2C
//Adafruit_BMP280 bmp(BMP_CS); // hardware SPI
//Adafruit_BMP280 bmp(BMP_CS, BMP_MOSI, BMP_MISO,  BMP_SCK);
void setup() {
  Serial.begin(9600);
  Serial.println(F("BMP280 test"));
  //if (!bmp.begin(BMP280_ADDRESS_ALT, BMP280_CHIPID)) {
  if (!bmp.begin()) {
    Serial.println(F("Could not find a valid BMP280 sensor, check wiring or "
                      "try a different address!"));
    while (1) delay(10);
  }
  /* Default settings from datasheet. */
  bmp.setSampling(Adafruit_BMP280::MODE_NORMAL,     /* Operating Mode. */
                  Adafruit_BMP280::SAMPLING_X2,     /* Temp. oversampling */
                  Adafruit_BMP280::SAMPLING_X16,    /* Pressure oversampling */
                  Adafruit_BMP280::FILTER_X16,      /* Filtering. */
                  Adafruit_BMP280::STANDBY_MS_500); /* Standby time. */
}
void loop() {
    Serial.print(F("Temperature = "));
    Serial.print(bmp.readTemperature());
    Serial.println(" *C");
    Serial.print(F("Pressure = "));
    Serial.print(bmp.readPressure());
    Serial.println(" Pa");
    Serial.print(F("Approx altitude = "));
    Serial.print(bmp.readAltitude(1013.25)); /* Adjusted to local forecast! */
    Serial.println(" m");
    Serial.println();
    delay(2000);
}
Project Test
Once the components are wired as per the wiring diagram, connect the Arduino to the PC and upload the program. Open the Serial Monitor in the Arduino IDE and the temperature, barometric pressure and approximate altitude will be displayed.