Read this article if you want to precisely time events along with your multitasking tasks. Here you’ll learn about the ESP32 Software Timer.
Introduction
There are times when you need to time different kinds of events on your projects. Sometimes, you need to fetch sensor data at specific time intervals. Other times, you need to keep a system woken up or backlit while pressing some keys for a predetermined period. Whatever the situation, you may use a handy ESP32 software timer.
What is a SofTware Timer?
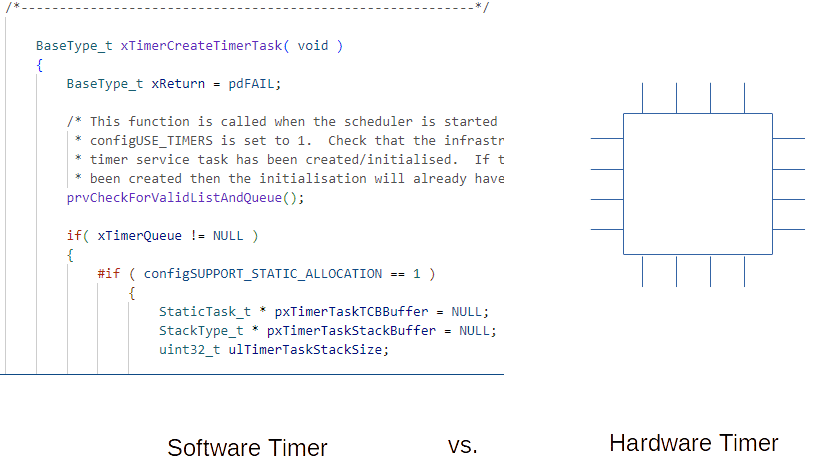
As its name implies, Software Timers are FreeRTOS software-based implementations of a timer. Why make it software-based you might ask while there are several hardware timers available on your microcontroller? The reason is advanced microcontrollers (such as your ESP32s, STM32s, RPI Picos, etc.) work under an Operating System (OS) (such as FreeRTOS). FreeRTOS manages many of your device’s resources (such as your ADCs, Timers, UARTs, etc.) to make them run smoothly on your system. With this process, the user can be freed of such resource management tasks and simply concentrate on their application. Essentially, a software timer manages timing events without using hard to setup hardware timers.
Note that a software timer is not directly related to any hardware timers or counters per se. They work with your FreeRTOS tick rate. That’s what an ESP32 software timer is all about.
How to SETup a Software Timer
Create a software timer callback function first. This will be the function to run once your pre-determined period expires. The callback function can be any C function. Note that it’s better to keep it short to make the process efficient (such as what’s done on an ISR). The parameter of the callback function should contain a TimerHandle_t type and it must return a void type.
void a_timer_callback(TimerHandle_t xtimer);
Next, create your Software Timer with:
TimerHandle_t xTimerCreate( const char * const pcTimerName, TickType_t xTimerPeriodInTicks, UBaseType_t uxAutoReload, void * pvTimerID, TimerCallbackFunction_t pxCallbackFunction );
Where:
- pcTimerName – is a constant name to describe your timer.
- xTimerPeriodInTicks – is the timer period to wait in ticks.
- uxAutoReload – pdTRUE if the timer is a repeating timer, while pdFALSE if it’s a one-shot type.
- pvTimerID – a void pointer that can be used as ID for a current timer.
- pxCallbackFunction – is your software timer callback function.
- Returned value – the handle of the timer if created successfully. Otherwise, it is a NULL value.
After which you can start, stop, reset, or even change the period of your Software Timer:
xTimerStart( TimerHandle_t xTimer, TickType_t xTicksToWait );
xTimerStop( TimerHandle_t xTimer, TickType_t xTicksToWait );
xTimerReset( TimerHandle_t xTimer, TickType_t xTicksToWait );
xTimerChangePeriod( TimerHandle_t xTimer, TickType_t xNewTimerPeriodInTicks, TickType_t xTicksToWait );
The xTicksToWait parameter is used to determine how many ticks to wait before the calling task is unblocked as it sends the commands to the timer daemon task queue.
Example Application 1
Here is an example usage of an ESP32 software timer. The code below shows an LED strip run with a pre-determined blinking speed. The speed is set up using an auto-reload software timer.
					#include <stdio.h>
#include <driver\gpio.h>
#include <freertos\FreeRTOS.h>
#include <freertos\task.h>
#include <freertos\timers.h>

#define LED_STRIP1_G GPIO_NUM_4
#define LED_STRIP1_R GPIO_NUM_5
#define LED_STRIP1_B GPIO_NUM_6

#define LED_STRIP1_BIT_MASK (1ULL << LED_STRIP1_G | 1ULL << LED_STRIP1_R | 1ULL << LED_STRIP1_B)

void config_gpio(void);
TimerHandle_t LED_strip_timer;
void LED_strip_timer_callback(TimerHandle_t LED_strip_timer);
gpio_config_t myGPIOconfig;

void app_main(void)
{
    config_gpio();

    LED_strip_timer = xTimerCreate("blink_led_strip", pdMS_TO_TICKS(500), pdTRUE, 0, LED_strip_timer_callback);

    xTimerStart(LED_strip_timer, 0);

    for(;;)
    {
        vTaskDelay(10);
    }

}

void config_gpio(void)
{
    // Configure Digital I/O for LEDs
    myGPIOconfig.pin_bit_mask = (LED_STRIP1_BIT_MASK);
    myGPIOconfig.pull_down_en = GPIO_PULLDOWN_DISABLE;
    myGPIOconfig.pull_up_en = GPIO_PULLUP_DISABLE;
    myGPIOconfig.mode = GPIO_MODE_OUTPUT;
    myGPIOconfig.intr_type = GPIO_INTR_DISABLE;

    gpio_config(&myGPIOconfig);
}


void LED_strip_timer_callback(TimerHandle_t LED_strip_timer)
{
    static BaseType_t LED_toggle;

    if(LED_toggle == 0)
        gpio_set_level(LED_STRIP1_G, 0);
    else
        gpio_set_level(LED_STRIP1_G, 1);

    LED_toggle ^= 1;
}
The software timer handle is LED_strip_timer. As you’ll see above, the GPIOs are configured first through config_gpio(). The LED_strip_timer is created with xTaskCreate, and then started with xTimerStart().
The LED_strip_timer_callback() function simply toggles the green LED of the LED strip every time the counter period expires.
Example Application 2
This next application lights up an LED strip once a push button is pressed. It remains lit for a pre-determined period set by a software timer. This period may be reset once the push button is pressed again. When the pre-determined period expires, the LED strip is turned OFF to save power.
					#include <stdio.h>
#include <driver\gpio.h>
#include <freertos\FreeRTOS.h>
#include <freertos\task.h>
#include <freertos\timers.h>

#define LED_STRIP1_G GPIO_NUM_4
#define LED_STRIP1_R GPIO_NUM_5
#define LED_STRIP1_B GPIO_NUM_6

#define PUSH_BUTTON_1 GPIO_NUM_7

#define LED_STRIP1_BIT_MASK (1ULL << LED_STRIP1_G | 1ULL << LED_STRIP1_R | 1ULL << LED_STRIP1_B)
#define PUSH_BUTTON_1_BIT_MASK (1ULL << PUSH_BUTTON_1)

void config_gpio(void);
TimerHandle_t LED_strip_timer;
void LED_strip_timer_callback(TimerHandle_t LED_strip_timer);
void Wait_for_Keypress_Task(void *parameters);
BaseType_t LED_Backlight;
gpio_config_t myGPIOconfig;

void app_main(void)
{
    config_gpio();

    LED_strip_timer = xTimerCreate("blink_led_strip", pdMS_TO_TICKS(5000), pdTRUE, 0, LED_strip_timer_callback);

    xTaskCreate(Wait_for_Keypress_Task, "wait for keypress", 1024, NULL, 2, NULL);

    xTimerStart(LED_strip_timer, 0);

    for(;;)
    {
        vTaskDelay(10);
    }

}

void config_gpio(void)
{
    // Configure Digital I/O for LEDs
    myGPIOconfig.pin_bit_mask = (LED_STRIP1_BIT_MASK);
    myGPIOconfig.pull_down_en = GPIO_PULLDOWN_DISABLE;
    myGPIOconfig.pull_up_en = GPIO_PULLUP_DISABLE;
    myGPIOconfig.mode = GPIO_MODE_OUTPUT;
    myGPIOconfig.intr_type = GPIO_INTR_DISABLE;

    gpio_config(&myGPIOconfig);

    gpio_set_direction(PUSH_BUTTON_1, GPIO_MODE_INPUT);
    gpio_set_pull_mode(PUSH_BUTTON_1, GPIO_PULLUP_ONLY);

}

void Wait_for_Keypress_Task(void *parameters)
{
    for(;;)
    {
        //Check for any Keypress
        if(gpio_get_level(PUSH_BUTTON_1) == 0)
        {
            // if previously unlit light it up
            if(gpio_get_level(LED_STRIP1_G) == 0)
                gpio_set_level(LED_STRIP1_G, 1);

            // reset software timer
            xTimerReset(LED_strip_timer, 0);
        }
    }
}

void LED_strip_timer_callback(TimerHandle_t LED_strip_timer)
{
    static BaseType_t LED_toggle;

    // software timer expired
    // simply set led off (back lighting effect)
    gpio_set_level(LED_STRIP1_G, 0);

}
As in the first example, the LED pins are configured in config_gpio() and the software timer handle is LED_strip_timer. This time around, there is a new task created called Wait_for_Keypress_Task. The software timer callback function is still called LED_strip_timer_callback but it has a new definition.
The Wait_for_Keypress_Task simply polls for a keypress. When it sees a keypress it turns the green LED ON and resets the software timer through the xTimerReset function.
The LED_strip_timer_callback activates when the software timer period expires. At this time, the Green LED is turned OFF to save power (like what a backlit keyboard does).
SHOP THIS PROJECT
-
Sale!


ESP32-CAM WiFi Bluethooth Development Board with OV2640 Camera Module
$31.95Original price was: $31.95.$29.95Current price is: $29.95. Add to cart